As a customer who purchases workstations, servers and clusters from Colfax International, you can remotely access your built systems prior to shipping. There are several reasons why you may wish to do that:
- To validate the system configuration;
- To provision and configure the operating system;
- To ensure the performance and stability of the system with your new workload;
- To prepare the new machine for integration into your computing infrastructure;
- For systems returned for repairs or maintenance — to validate the services applied.
When your server is built by Colfax, we will ask you how you would like it provisioned: OS, networking, storage, custom software. However, if your configuration or software stack is highly specialized so that it requires installation by your technical specialist, or if you cannot easily access your datacenter to provision the new server, Colfax’s Customer Remote Access℠ (CRA) service may provide you an operational boost, allowing you to directly provision and configure your servers and verify their configurations.
This publication explains how the Colfax Customer Remote Access experience is organized and how you can use it to optimize the deployment of your Colfax server.
If you have been directed to this page by a Colfax representative, please click the button below to proceed to the private portal. You will need to create a free Colfax Experience Center account or log in if you already have one.
Important: use your work email address when registering for a Colfax Experience Center account.
SSH Connection
As long as your Colfax server runs a flavor of Linux, the most practical and secure method to access it is a Secure Shell (SSH) connection with public key authentication.
To use this method, you will have to create an SSH key pair (or use an existing pair if you already have one). The private key part is used to encrypt your data. You should keep it on your local system and never share with anyone. The public part is used to decrypt your data and to grant you access to servers. You can share it with people and entities that need to authenticate you using this key. When you share this key with Colfax, we will store it in our secure key server and configure your Colfax server to accept incoming SSH connections authenticated with this key.
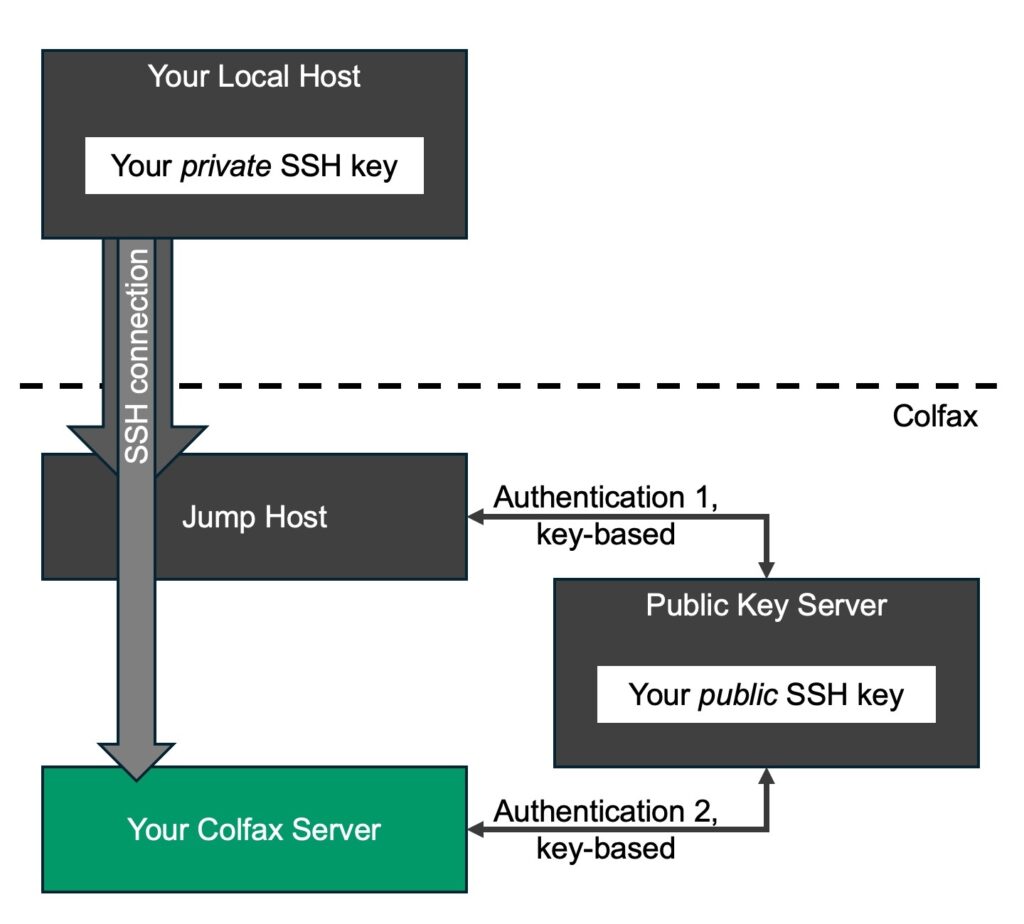
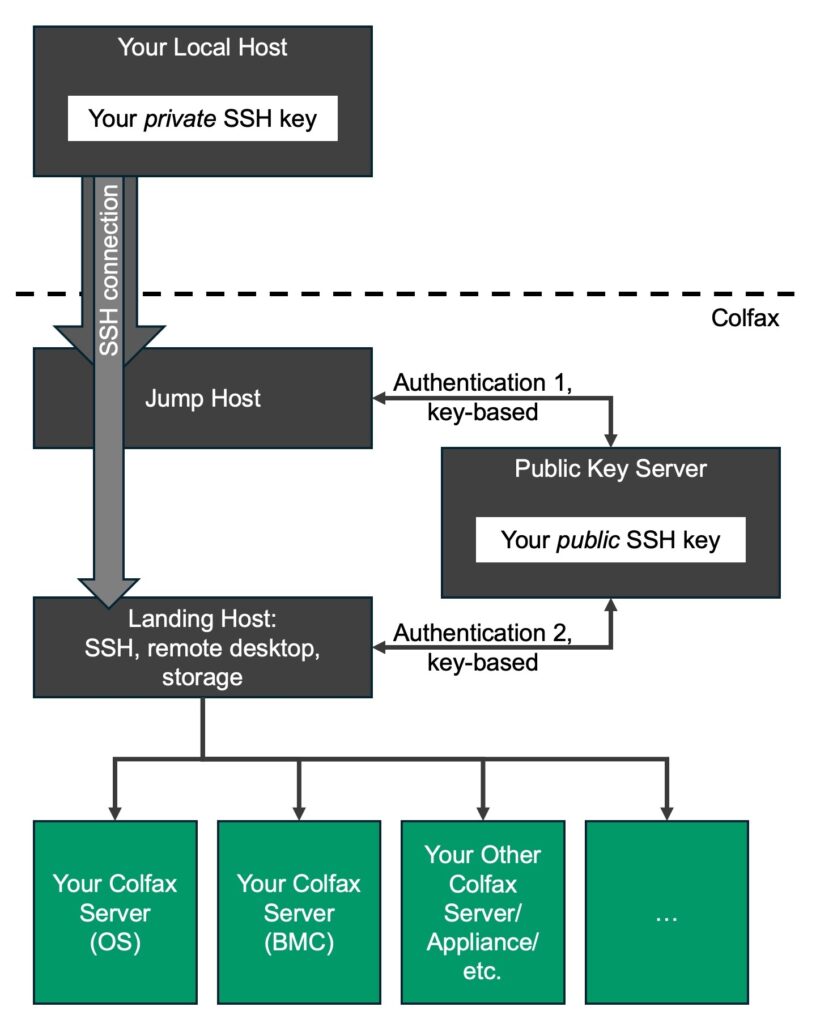
For additional security, we do not expose your Colfax server directly to the Internet. Rather, we run a Jump Host that is exposed to the Internet and configure it to accept incoming SSH connections, authenticate them using your public key (Authentication 1), and forward these connections to your Colfax server. At the final destination, the SSH connection is authenticated once more using your SSH key (Authentication 2). This ensures that, even if your Colfax server is running some services other than SSH, they will not be exposed to unauthorized traffic.
Our documentation guides you through the configuration of a key-based SSH connection passing through a Jump Host. The resulting connection operates as illustrated in the diagram below.
To allow your Colfax server to communicate with our Public Key Server, our technicians will add a few lines to the SSH server configuration file on it. These lines may be retained when you receive your Colfax server (unless we re-provision it prior to shipping), however, they will not impact its operation in your environment. You can also remove these configuration lines from the file /etc/ssh/sshd_config with no ill effects.
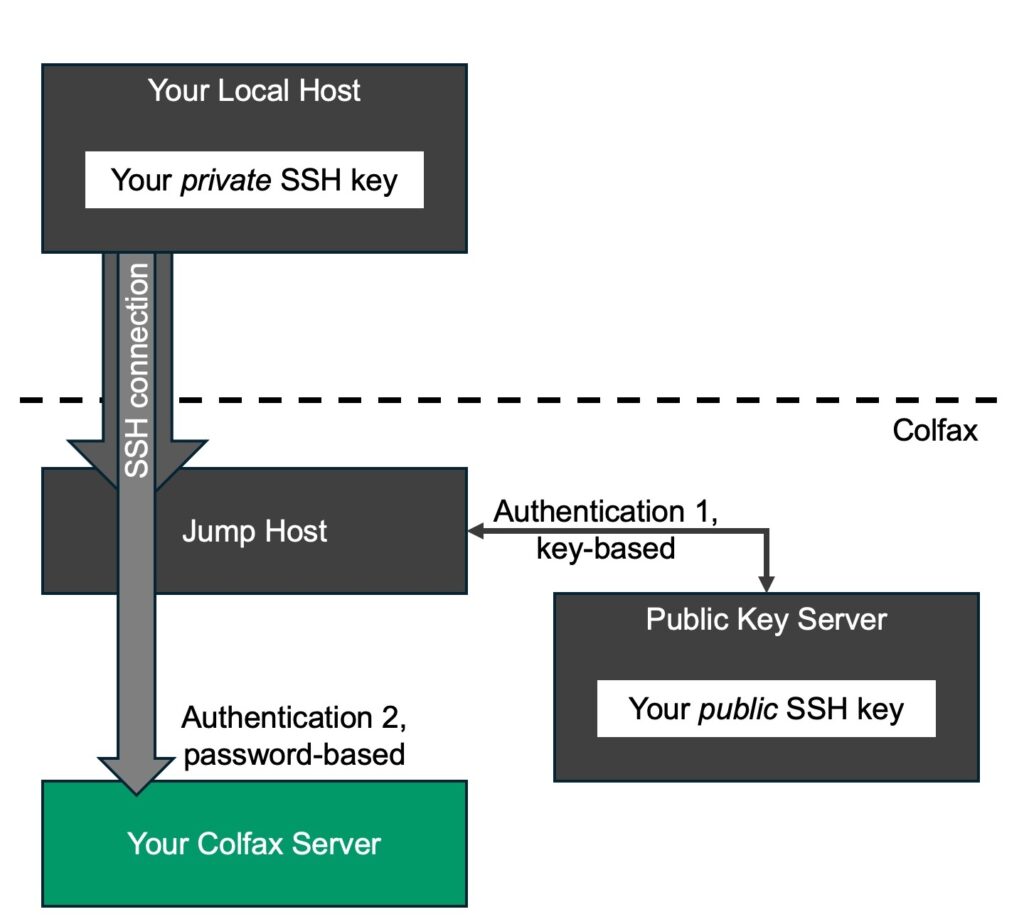
It is also possible for us to configure your server to receive password-authenticated SSH sessions instead of key-authenticated. This setup will retain its security because the Jump Host in front of your Colfax server, however, you will have to enter a password every time you connect to it. The authentication flow for this configuration option is shown below. There, Authentication 2 is password-based, unlike the default option.
Contact us by replying to your invitation email if you wish to proceed with this configuration option.
Shell and Beyond
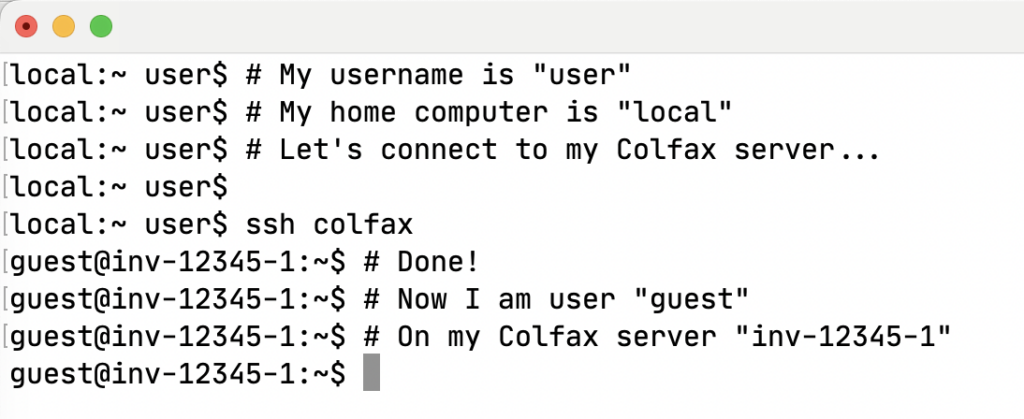
When you establish an SSH connection to your Colfax server, your terminal will open a shell session on it. Users familiar with Linux will feel right at home in the shell session. It allows you to interact with the files and processes on your server, query and modify its configuration, install software, run applications and benchmarks.
Your Colfax server will have access to the Internet, so you can clone repositories, pull containers, install additional software, as well as copy your data to it.
Besides a shell session, you can interact with your Colfax server using remote desktop, a Jupyter Notebook/JupyterLab interface, or any other IP-based service. To do this, you will use port forwarding as described in our F.A.Q. section. With port forwarding, your SSH client will forward one of your local ports through the SSH pipe to a port on your Colfax server managed by an IP-based service. This will give you an encrypted path to your remote service.
User Portal
To allow you to manage your SSH keys and to receive up-to-date status and instructions for your Customer Remote Access experience, we are providing a User Portal. The first time you use this portal, you will have to sign up for a Colfax Experience Center account and verify the email address used for it.
You will be guided to the sign-up process by an email invitation that our technicians initiate once your Colfax server is ready for remote access. Make sure that you sign up and verify the same email address as the one that the invitation is sent to. We will use this address to match your new account to the reserved Customer Remote Access session on your Colfax server.
If you already have a Colfax Experience Center account with the correct email address (from an earlier remote access session or from one of our Test Drive programs), you can re-use it, no need to sign up for a new one.
Once you log in to the User Portal, you will see instructions for uploading your public SSH keys, configuring your SSH client for connection with your Colfax server, and a variety of useful tips in the Frequently Asked Questions section.
Remote Access Security
We use industry-standard practices for protecting your Colfax server from unauthorized access. These include:
- Isolating your server from the Internet with the help of a firewall and a Jump Host as explained above;
- Isolating your server from other tenants of the Customer Remote Access program by placing it into a separate private network;
- Further protecting your network from third-party traffic by VLAN-tagging the traffic directed to your Colfax server;
- Securing the management services used for access automation with TLS, JWT, network isolation, and other appropriate mechanisms;
- Using a well-supported third-party implementation of the OAuth 2.0 protocol for access authorization to the User Portal.
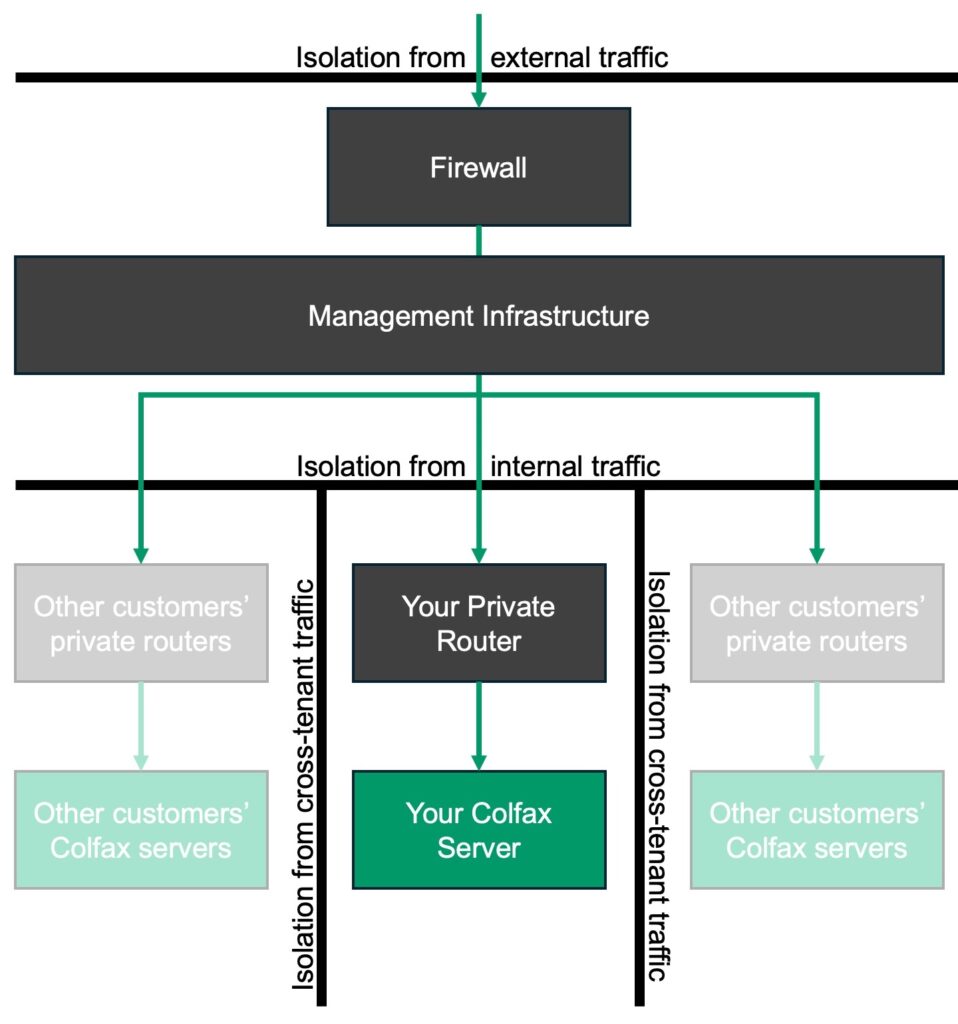
With your Colfax server protected from external, internal, and cross-tenant traffic, only you and Colfax staff have the ability to interact with the server. Colfax applies the same high standards to your privacy during remote access as we do to building, testing, and shipping your Colfax-built systems. Our technicians will access your server only if you explicitly request us to do so for the purposes of assistance, troubleshooting, or any other need that you have. Colfax does not retain any technical means to access your server after the remote access program.
Please do your part in securing your Customer Remote Access experience:
- Use a strong password for your Colfax Experience Center account and do not share it with others. If you need to share access to the server with a colleague, use the methods described in the section “Collaboration”;
- Keep the private part of your SSH key secure and do not share it with anyone;
- Be mindful of services and settings of your server that you create that may open it to unauthorized access once it leaves the Colfax infrastructure.
Collaboration
If you need to share remote access to your server with others, do not give them your Colfax Experience Center account. Instead, add their public SSH key to your account, which will grant them SSH access. Additionally, you can create a separate user account for them if necessary. You can find details of these methods in our Frequently Asked Questions.
Customer Remote Access Scale℠
The remote connection procedures outlined above are simple and useful when you need to access only the operating system of your Colfax server, and when you are accessing only one server. If you
- want to access multiple servers from your order at the same time or
- need to access the Baseboard Management Controller (BMC) of one or more servers (e.g., to install operating systems or modify the BIOS settings of your servers) or
- intend to access non-Linux devices in your order, such as switches, appliances, and virtual machines,
you can request a Customer Remote Access Scale℠ experience. In this option, the SSH session is established not with your server but with a Landing Host, which is a Linux virtual machine. From the Landing Host, you can access the network on which your Colfax servers reside.
To talk from Landing Host to the Colfax servers and other devices in your order, you can
- Chain your SSH connections: SSH into the Landing Host and then SSH to the physical Colfax hosts in your order;
- Use SSH port forwarding to forward ports on your local host to the IP services (SSH/HTTP/etc.) on your devices and access them locally. This is useful, e.g., for accessing the remote BMC from your local browser and for direct SSH from your local host to your Colfax servers;
- Establish a remote desktop connection to the Landing Host, open a browser on it, and use it to access HTTP services on your Colfax servers or their BMCs;
- Use a VPN client to connect to your private network (this functionality is under development);
- Access HTTP services (e.g., BMCs) directly from the User Portal while our infrastructure handles authentication, authorization and encryption, no SSH connection necessary (this functionality is under development).
All security measures of the standard Customer Remote Access experience are retained in the Customer Remote Access Scale experience. Additionally, in the Scale mode, your servers do not need to be configured to accept key-based SSH connections, and you are in charge of setting up authentication to your specifications.
What This Means for You
The Customer Remote Access experience is a powerful tool for preparing your Colfax servers for integration into your or your customer’s infrastructure. You can install operating systems, configure BIOS settings, test networking, and otherwise prepare your Colfax servers for deployment before they are boxed and shipped to you. It may reduce your logistical hassles, eliminate remote hand expenses in the datacenter, and accelerate your infrastructure development. If you are interested in this experience, contact us by email.
Begin Your Remote Access
If you have been directed to this page by a Colfax representative, please click the button below to proceed to the private portal. You will need to create a free Colfax Experience Center account or log in if you already have one.
Important: use your work email address when registering for a Colfax Experience Center account.